Pages

Saturday, August 28, 2010

Windows Registry Modification

Here are some Windows registries that you can do the modification to get a powerful Windows, specially for Security matters.

All you have to do first, it's DO THE BACKUP !!! Run the regedit.exe and click File menu then EXPORT.
And please remember before you do some modifications, do it with your own risk !

Disable / Enable Windows Wallpaper changing
To prevent other users to change the wallpaper, change the Data value to 0 to Enabled or 1 to Disable at
HKEY_CURRENT_USER,Software\Microsoft\Windows\CurrentVersion\Policies\ActiveDesktop
Value Name : NoChangingWallpaper
Data Type : DWORD Value

Show / Hide Folder Option at Windows Explorer
Note: Some computer viruses cause Folder Option menu at Windows Explorer disabled.
HKEY_CURRENT_USER,Software\Microsoft\Windows\CurrentVersion\Policies\Explorer
Value Name : NoFolderOptions
Data Type : DWORD Value
Data : 0 = show, 1 = hide

Show / Hide File menu at Windows Explorer
HKEY_CURRENT_USER,Software\Microsoft\Windows\CurrentVersion\Policies\Explorer
Value Name : NoFileMenu
Data type : DWORD Value
Data : 0 = show, 1 = hide

Remove arrow image at Shortcut icon
HKEY_CLASSES_ROOT\piffile
Value Name : IsShortcut
Data Type : String Value
Delete the value

Show / Hide Taskbar and Start Menu
You can use this if you want to make a kiosk PC or something like that.
HKEY_CURRENT_USER,Software\Microsoft\Windows\CurrentVersion\Policies\Explorer
Value Name : NoSetTaskbar
Data Type : DWORD Value
Data : 0 = show, 1 = hide

Show / Hide Shutdown Menu
HKEY_CURRENT_USER,Software\Microsoft\Windows\CurrentVersion\Policies\Explorer
ValueName : NoClose
Data Type : DWORD Value
Data : 0 = show, 1 = hide

Disable / Enable Right Click at desktop
HKEY_CURRENT_USER,Software\Microsoft\Windows\CurrentVersion\Policies\Explorer
Value Name : NoViewContextMenu
Data Type : DWORD Value
Data : 0 = Enable, 1 = disable
»»  READMORE...

Thursday, August 26, 2010

Using .NET object in Powerbuilder

For all of you who still using Powerbuilder version 9.0 to above, and want to using .NET object, you can try this trick to do that.

You'll need Microsoft Visual Studio (in this case, I'm using version 2005 with .NET 2.0 framework). And also, you must download Interop Forms Toolkit version 2.1 at Microsoft MSDN site.

The Interop Forms Toolkit 2.1 is a free Visual Studio add-in that simplifies the process of displaying .NET forms and controls in a Visual Basic 6 application. Instead of upgrading the entire code base, these applications can now be extended one form at a time. The goal is a phased upgrade, with production releases at the end of each iteration containing both Visual Basic 6 and Visual Basic .NET forms running in the same Visual Basic 6 process.

Close your VS2005 before you install the Interop Form Toolkit.

Since almost all the objects which made for Visual Basic 6, can used by Powerbuilder application, I'm sure we can use this technique in Powerbuilder too.

Now, here's the steps

Creating .NET Object
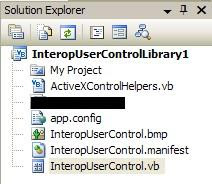
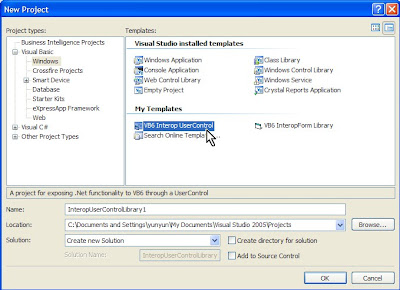
  • Open VS, and create new project with Project Type: Windows, and template: VB6 Interop UserControl

  • You'll see like figure above, at the Solution Explorer windows.

  • Open InteropUserControl.vb and create an application. You can use the third party object too.

  • Save and try to rebuild and run the application by pressing F5 button.
  • That's all for the creating .NET object.

Using .NET Object in Powerbuilder
  • Open your Powerbuilder. I'm using version 6.5 in this example.
  • Create new application, then create new window.
  • Insert OLEObject into the new window. You should see the InteropUserControlLibrary1 object in INSERT CONTROL tab. If you can't see the object, do the registering system.dll step. See at the bottom of this article to do that.

  • Choose the InteropUserControlLibrary1 object and place somewhere inside the window.

  • Save and try to run the application.

  • Now, you have .NET object in your Powerbuilder application.

Registering the system.dll so that it can be used from Powerbuilder
  1. Navigate to Start | Run.
  2. In the Run dialog, enter CMD, and click OK.
  3. Enter cd C:\WINDOWS\Microsoft.NET\Framework\v2.0.50727.
  4. Enter regasm system.dll.
»»  READMORE...

Tuesday, August 24, 2010

Turn off the autorun of removable drive

Flash Drive, USB Drive, External Hard drive an Memory Card are an easy target for computer viruses entry into the computer system in the PC / notebook of us.

The present computer viruses can infect our system just when you plug the external devices. All could be happen because in the Windows Operating System, there is a technology call Autorun, which make possible to computer or system to run all the applications inside the external disk, automatically.


The preventive ways are: you installing the anti virus application and the security application on your PC or Notebook, and always do update the newest updated files as often as you can, and do the virus checking every time you plug the external devices. And also, play safely with your external devices, by not plug into any other unknown computers. But, like I mention above, that virus can infect our system just when you plug you external device, not even you have a chance to scan the device. How to solve that?


You can do turn off the autorun system by doing modification of your computer policy. Here's the step:
  1. On Start Menu, chooce Run and type gpedit.msc
  2. There are 2 sides (left and right) panels.
  3. On Left panel, pointing to tree view menu of Local Computer Policy, Computer Configuration, Administrative Template, System
  4. Then, on the right panel, find and right click Turn Off Autoplay and click Properties menu
  5. You can set to enable or disable the the Autorun, and even you can select for selected device to turn off.
  6. Click OK to finish.
  7. Restart your computer


This tips can be done for starting Windows 2000 until Windows 7 version.
»»  READMORE...

Monday, August 23, 2010

Twitter with Powerbuilder

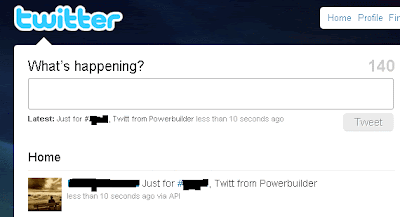
Inspired from this article, I trying to made a simple script to post to Twitter from Powerbuilder. All you need is msxml2.dll which located at c:\windows\system32.

And also, you need to create a Twitter's account. Using an OleObject object, try this simple script:

Integer i
OleObject oleTwitter

OleTwitter = CREATE OLEObject
i = oleTwitter.ConnectToNewObject("Msxml2.XMLHTTP")
if i = 0 then
   oleTwitter.Open("POST", "http://youraccount:yourpassword@twitter.com/statuses/update.xml?status=Just for #..., Twitt from Powerbuilder", False)
   oleTwitter.setRequestHeader("Content-Type", "text/xml")
   oleTwitter.Send()
else
   MessageBox("Error","Cannot connect to Object"
end if

Please beware, I don't give a guarantee for any security matters that will caused for your Twitter's account, since I don't have any deep experiences using the XML.

And this is the result:

»»  READMORE...

Saturday, August 21, 2010

How to fix Facebook for Blackberry notification

Blackberry just releases the new version of Facebook for Blackberry. The new version is 1.80.49. You can download via Blackberry Application World.

Some of my friends facing that after they downloaded the new version, they didn't receive the online notifications.

Here is the step that may help you if you are facing the same problem above:

  1. Make sure your facebook email account is registered with Blackberry push email in your blackberry device
  2. Make sure your facebook email notification is not blocked by your email provider, make sure not in Spam list.
  3. Remove your facebook for blackberry application from your device, then restart the device with pull out the battery
  4. Re install facebook for blackberry application into your device with Blackberry App World or via www.blackberry.com/facebook Restart the device by pull out the battery
  5. Log on to your facebook account via PC, make sure turn on all the check list notifications at Option setting
  6. Make sure to always do LOG OUT everytime you log on into your facebook account at the PC
  7. Open your facebook for blackberry application, and do the Log on Wizard by open the Option menu.
Now, you should receive the notification(s) at your device.
»»  READMORE...

Friday, August 20, 2010

Creating Outlook Calendar Appointment with Powerbuilder

Microsoft Outlook is a popular Personal Information Management application. It is part of Microsoft Office package, which many users use it. Fortunately, Microsoft, as the maker Microsoft Outlook, has prepared the SDK to allows programmers to create their own applications that can interact seamlessly into the application Microsoft Outlook

One of the Outlook's feature is Calendar which it make possible to user to create their own schedule and will remind for it. It's very useful for people who has many schedules in their life.

In this part of session, I will try to explain how to insert or create a new appointment in outlook, programmatically, with Powerbuilder. One thing you should learn and know is Outlook Object Model, which you can find at Microsoft's MSDN site


Microsoft has prepared the AppointmentItem Class which has many properties, to create a new Appointment Object in Microsoft Outlook Calendar. Some properties that are commonly used for the calendar class are: Subject, Start, Duration, and Reminder.


First, you (or PC clients) must has Microsoft Outlook installed. Then at the script, you must declare OleObject variable type, than try to create the object and connect to Microsoft Outlook Object. In this example, I'm using Microsoft Outlook 2007 and Powerbuilder 6.5. Here's the full script to create a new Appointment Object:

// declare OleObject variable and Constant Variable
oleobject oleOutlook
oleobject oleAppt
Constant Integer olAppointmentItem = 1

// create the Object
oleOutlook = create oleobject

// Connect To the Outlook Object
oleOutlook.ConnectToNewObject ('Outlook.Application')

// Create the Appointment Object
oleAppt = oleOutlook.CreateItem (olAppointmentItem)

// Set some common properties of Appointment Object
oleAppt.Location = "Home"
oleAppt.Subject = "Watch Fulham vs Manchester United Live"
oleAppt.Start = "08/21/2010 19:00"
oleAppt.ReminderMinutesBeforeStart = 1  // in minute
oleAppt.Duration = 120 // in minute
oleAppt.Body = "Go MU !!! Go !!!"

// Save the Appointment
oleAppt.Save


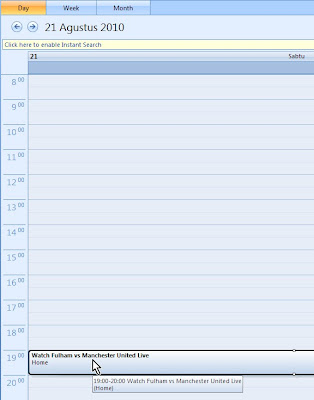
And here the result of the example:


»»  READMORE...

Thursday, August 19, 2010

Microsoft Agent programming with Powerbuilder

According of wikipedia site, Microsoft Agent is a technology developed by Microsoft which employs animated characters, text-to-speech engines, and speech recognition software to enhance interaction with computer users. Thus it is an example of an embodied agent. It comes preinstalled as part of Microsoft Windows 2000 through Windows Vista (it is not part of Windows 7). Microsoft Agent functionality is exposed as an ActiveX control that can be used by web pages.

Before you can use the Agent in Powerbuilder, you need to download Microsoft Agent from Microsoft Agent site and install it into your computer. There 2 cores that you must download, one is Microsoft Agent core component, and the other is the Agent Character, which have 4 characters officially from Microsoft.

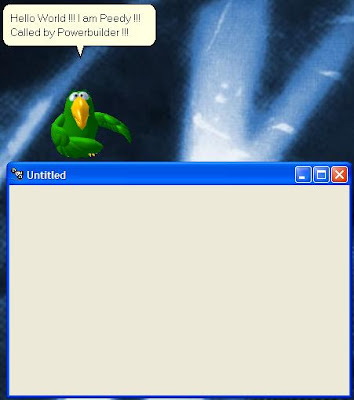
In this sample, I use Peedy, a green talking bird as a character

The next step is try to insert OLE Object at Powerbuilder's windows object. Choose the Microsoft Agent 2.0 from the Insert Control Tab.

Add Microsoft Agent Control 2.0 from the list

Agent OLE Object after inserted
In the Open event of window w_agent, type this script below:

//  set the agent, and named as Clippit
ole_1.Object.Characters.Load("Clippit","c:\windows\msagent\chars\peedy.acs")

// show the Clippit
ole_1.Object.Characters("Clippit").Show

// move the Clippit to position 400,200
ole_1.Object.Characters("Clippit").MoveTo(400,200)

// ask Clippit to play animation Greeting
ole_1.Object.Characters("Clippit").Play("Greet")

// ask Clippit to say something
ole_1.Object.Characters("Clippit").Speak("Hello World !!! I am Peedy !!! Called by Powerbuilder !!!")

If you have a speaker (and I bet you have), you can hear the voice speaking from Character.
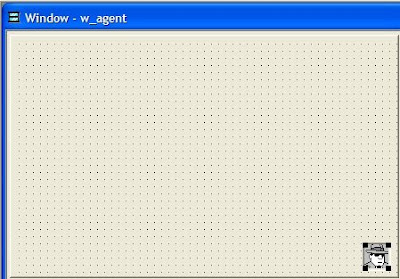
Run the script, and you will get like this image


There's many build in functions in Agent character, and also many third party characters which you can find at Microsoft Agent's ring.

You can learn more about the functions and properties at Microsoft Agent official site, including the guidelines if you want to create your own character.

Of course, if you want to deploy your Powerbuilder applications with Microsoft Agent object, you also need to install Microsoft Agent cores at the PC Client.
»»  READMORE...

Powerbuilder function to get business day

The function is to get total business days between 2 dates, it means we ignore the Saturday and Sunday.
The function need 2 parameters to pass with datetime type, called: adt_awal and adt_akhir, and will return Long type.


integer i, counter, li_daynumber, li_weeks, li_daysremained
long ll_daysafter

ll_daysafter = DaysAfter(date(adt_awal), date(adt_akhir))
li_weeks = ll_daysafter / 7
li_daysremained = mod(ll_daysafter,7)
counter = li_daysremained

FOR i = 1 TO counter
    li_daynumber = DayNumber(RelativeDate(date(adt_awal), i))
    IF li_daynumber = 1 OR li_daynumber = 7 THEN
       li_daysremained --
    END IF
NEXT

RETURN (li_weeks * 5) + li_daysremained

To use this function, just type this script:

Long lBusinessDay
lBusinessDay = f_businessday(DateStart,DateEnd)
»»  READMORE...

Array in Powerbuilder

Array is an indexed collection of elements of a single data type. An array can have one or more dimensions. One-dimensional arrays can have a fixed of variable size; multidimensional array always have a fixed size.

In Powerbuilder, any simple variable declaration becomes an array when you specify brackets [] after the variable name. For fixed-size arrays, you specify the sizes of the dimensions inside those brackets.

There are 2 types of array in Powerbuilder:
1. Variable Array
2. Fixed Array.

Samples in Powerbuilder script to declare an array

integer ali_number[ ] //Array of integers.
decimal {2} ald_harga[ ] // Array of decimal with 2 digits of precision
date ald_birthdate[ ] // array of date
integer ali_number[3] // fixed array of 3 integers
string als_daysname[7] // fixed array of 7 strings
integer ali_score[2,3] // 2 dimensional array of integer, means that we declare a 6-elements
long all_days[3,300,50] // 3 dimensional array of long, which have 45000 elements of array

There are 2 functions that provided for array data type in Powerbuilder: upperbound, lowerbound
»»  READMORE...

Wednesday, August 18, 2010

Money in Word function with Powerbuilder

Usually, we must write down the value of money in Invoice Document, to prevent user to cheat the value. Let say, US$ 99,80 will write as Ninety Nine Dollar and Eighty Cent.

This is the function script to write the money value in string.

First, we create f_translate function below. The function has a variable to pass called iNilai with Integer as data type. iNilai will represent the value of number that will return in word. So, the function will return a variable in string. This function will called at the main function.

string aSatuan[19], str, aPuluhan[9]
integer nRatus, nPuluh
aSatuan = { "one", "two", "three", "four", "five", &
            "six", "seven", "eight", "nine", "ten", &
            "eleven", "twelve", "thirteen", "forteen", &
            "fifteen", "sixteen", "seventeen", "eighteen", &
            "nineteen" }
aPuluhan = { "ten", "twenty", "thirty", "forty", "fifty", &
             "sixty", "seventy", "eighty", "ninety"}
               
IF nilai >= 100 THEN
   nRatus = Integer(String(nilai/100))
   IF nRatus = 1 THEN
      str += "one hundred"
   ELSE
      str += aSatuan[nRatus] + " hundreds"
   END IF
   IF nilai > 0 THEN nilai -= nRatus * 100
END IF

IF nilai >= 20 THEN
   nPuluh = Integer(String(nilai/10))
   IF nRatus > 0 THEN
      str += " and " + aPuluhan[nPuluh]
   ELSE
      str += aPuluhan[nPuluh]
   END IF
   nilai -= nPuluh * 10
   IF nilai > 0 THEN str += " " + aSatuan[nilai]
ELSE
   IF nilai > 0 THEN
      IF nRatus > 0 THEN
         str += " and " + aSatuan[nilai]
      ELSE
         str += aSatuan[nilai]
      END IF
   END IF
END IF   
                 
RETURN str


The main function is called f_moneystr with amount as a decimal variable to pass.

string str
decimal nMilyar, nJuta, nRibu

IF amount < 0 THEN RETURN ""
IF amount < 1 THEN str = "zero"

IF amount >= 1000000000000.00 THEN
   nMilyar = Integer(String(amount/1000000000000.00))
   str += f_Translate(nMilyar) + " trillion "
   amount -= (nMilyar * 1000000000000.00)
END IF

IF amount >= 1000000000 THEN
   nMilyar = Integer(String(amount/1000000000))
   IF nMilyar = 1 THEN
      str += "one billion "
   ELSE
      str += f_Translate(nMilyar) + " billion "
   END IF
   amount -= (nMilyar * 1000000000)
END IF

IF amount >= 1000000 THEN
   nJuta = Integer(String(amount/1000000))
   IF nJuta = 1 THEN
      str += "one million "
   ELSE
      str += f_Translate(nJuta) + " millions "
   END IF
   amount -= (nJuta * 1000000)
END IF

IF amount >= 1000 THEN
   nRibu = Integer(String(amount/1000))
   IF nRibu = 1 THEN
      str += "one thousand "
   ELSE
      str += f_Translate(nRibu) + " thousands "
   END IF
   amount -= (nRibu * 1000)
END IF

str += f_Translate(Integer(String(amount)))
str = RightTrim(str) + " US Dollar"
amount -= Integer(String(amount))
IF amount > 0 THEN
   amount *= 100
   str += " and " + f_Translate(amount) + " cent"
END IF
   
return str

To use this function, just call with this statement:

string sMoney
sMoney = f_moneystr(99.80)

Note: Thanks to Mr. AGP for the script :)
»»  READMORE...

Monday, August 16, 2010

Powerbuilder Structure

One of Powerbuilder's feature is Structure. Structure is a object which made possible for the programmer to store and passing the parameters in different types.

The example below is to explain how to use Structure in Powerbuilder

Let say, you need to passing 4 parameters which have 3 different data types: string, datetime and decimal, when you open a new window.

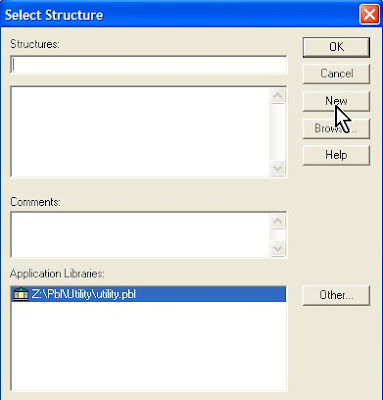
First, you need to create a new Structure. At the main painter, click Structure button.


Click New to create a new structure


Fill the variables that you want to pass. You can set the different type for each variables.


Save by clicking Save button (of Choose menu File than Save). Type str_dailydiscountreport as a name. str_ is a prefix to represent that the object is a Structure.

In the script that will open the new window, type following code. This code is to declare the new structure variable which pointed to str_dailydiscountreport structure that we have build in the first.

// declare new structure variable
str_dailydiscountreport strReport

// fill each variable in the structure
strReport.sProductCode = sle_productcode.text
strReport.dtDateFrom = datetime(em_datefrom.text)
strReport.dtDateUntil = datetime(em_datefrom.text)
strReport.dDiscount = Dec(em_discount.text)

// Open the new window with passing the structure
OpenWithParm(w_report,strReport)


How to received?
In event Open of the w_report window, do same with the script above.

// declare new structure variable
str_dailydiscountreport strReport

// receive the structure that passed from the window caller by using message object with PowerobjectParm as property
strReport = message.PowerobjectParm

// extract all the variables inside the structure
MessageBox("Product Code",strReport.sProductCode)
MessageBox("Date From",Str(strReport.dtDateFrom,'dd/mm/yyyy')
MessageBox("Date Until",Str(strReport.stDateUntil,'dd/mm/yyyy')
MessageBox("Discount",Str(strReport.dDiscount,'##.##') + "%"
»»  READMORE...

Connection String

For every database programmer, Connection String is a MUST term to be remembered. Connection string is one of way to connect to database.

Since we provided by the multi databases type, some times the programmers forget about how to fill the Connection String.

Don't worry, even we can search at the search engine, thank God we have www.connectionstrings.com who provides and help you to build the connection string online to all of the databases engine, even to connection to data files (for example: Excel file) and miscellaneous types engine like Microsoft Exchange.

Just choose the database engine which you want to connect, the connectionstrings.com will provide more than one connection strings, including Trusted Connection and the alternatives, even for Windows CE connection (if available). All you have to do is just copy and paste the connection string, and change several variables like User Name, Password and Server Name.
»»  READMORE...

Thursday, August 12, 2010

How to delete recently keyword in Windows Explorer search

In Vista and 7, Windows will store your search keyword that you've typed in a list.


If you want to delete all the recently keywords, you must to this registry tricks.
  • Open the regedit.exe
  • Point to HKEY_CURRENT_USER\Software\Microsoft\Windows\Explorer\WordWheelQuery
  • Delete all the REG_BINARY keys with number at the Name column (Right Panel)

»»  READMORE...

Wednesday, August 11, 2010

How to disassembly Toshiba Portege M900 - Part 11 - End

Remove LCD MASK
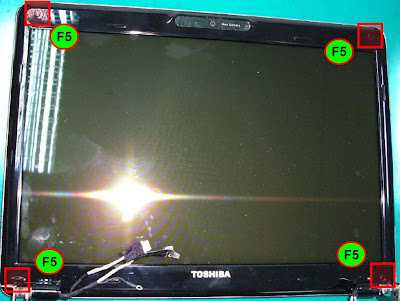
a. Remove 4 pcs of Mask Seals and F 5 screw


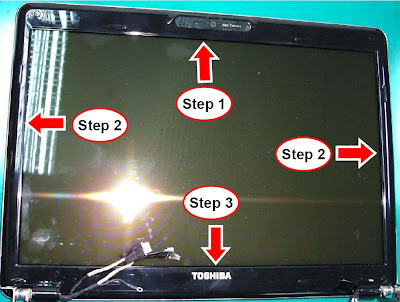
b. Remove LCD mask in this sequence. Refer next few slides for details.

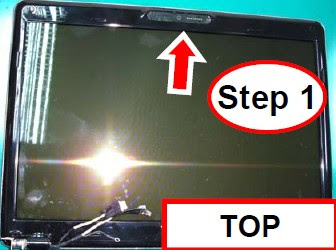
Remove LCD Mask [ Step 1: Top ]
Start from the center, rotate LCD mask SLOWLY from the inner portion. When click is heard, it is unlatched.


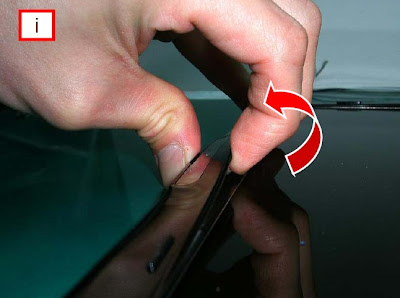
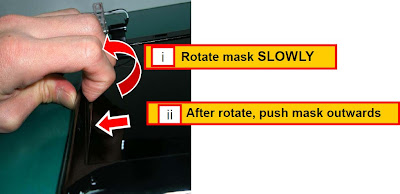
Remove LCD Mask [ Step 2: Left & Right ]
i*. Start from the center, rotate LCD mask SLOWLY from the inner portion When click is heard, it is unlatched.


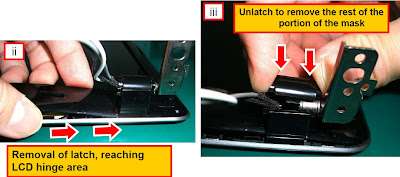
ii. Push the mask slightly outwards after [i*]


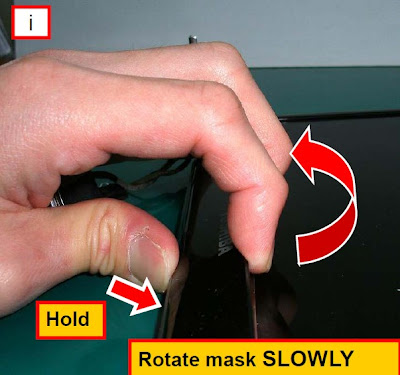
Remove LCD Mask [ Step 3: Bottom ]
i. Start from the center, rotate LCD mask SLOWLY from the inner portion. When click is heard, it is unlatched.


ii. Unlatch the mask near the LCD hinge when reaching the area.


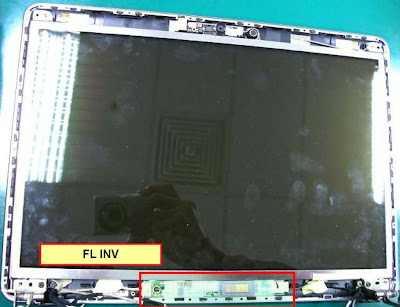
View of LCD panel


Part 1 || Part 2 || Part 3 || Part 4 || Part 5 || Part 6 || Part 7 || Part 8 || Part 9 || Part 10 || Part 11
»»  READMORE...

Tuesday, August 10, 2010

How to disassembly Toshiba Portege M900 - Part 10

Remove Display Assembly
To remove the DISPLAY ASSEMBLY, the Left, Right speakers and the LAN board has to be removed first.


Remove Left Speaker
a. Remove grounding screw F2 and unroute the LCD harness and Webcam cable


b. Remove 3pc x F2L screws from speaker. Take not of the rubber cushion on side speaker.


Remove Right speaker and LAN board

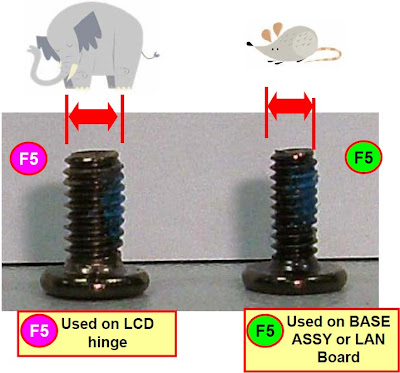
c. Remove 2pcs x F5 screw to remove the metal bracket and LAN board.


d. Remove 3pcs x F2L screws


Remove Display Assembly
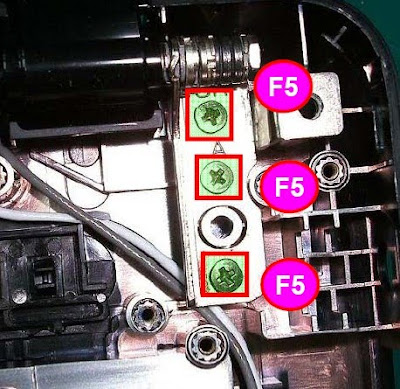
e. Remove 3pcs of F5 screws for Left LCD hinge


f. Remove 3pcs of F5 screws for Right LCD hinge


The F5 screw used for LCD hinge is different from those used for BASE ASSY or LAN Board


Continue to Part 11

Part 1 || Part 2 || Part 3 || Part 4 || Part 5 || Part 6 || Part 7 || Part 8 || Part 9 || Part 10 || Part 11
»»  READMORE...

Monday, August 9, 2010

How to disassembly Toshiba Portege M900 - Part 9

Remove Cooling Module

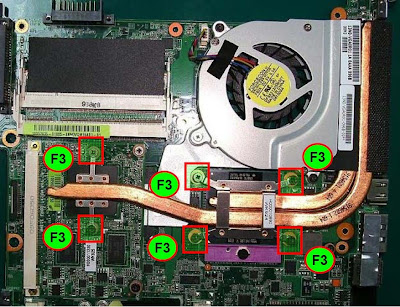
Remove 6pcs x F3 screws


Installing Cooling Module
The sequence of installation is as follows. The screw installing sequences are also marked on the cooling module.


Remove ATi Graphic Card
Remove 2pcs x F3 screws. Card will “pop” up by itself.

CPU grease usage
For CPU and ATi graphic the grey grease can be applied
After removing the CPU or ATI card from the cooling module, wipe the old grease off. Apply with fresh new grease.


Continue to Part 10

Part 1 || Part 2 || Part 3 || Part 4 || Part 5 || Part 6 || Part 7 || Part 8 || Part 9 || Part 10 || Part 11
»»  READMORE...

Friday, August 6, 2010

How to build web application with Powerbuilder 11.5

One of the feature in Sybase Powerbuilder version 11.5 is a native build the application into the web-based. You don't need to change the scripts, you can migrate directly from window based into web-based. All you need are IIS (Internet Information System) and AJAX installed on the computer, and of course Powerbuilder version 11.5

I'll try explain how to build your window based application into web-based. I'm using the sample application which come with Powerbuilder installer, named: Solutions. It should be on : your documents directory with Sybase\Powerbuilder 11.5\Tutorial as sub directory.
Original Workspace


First, try to create new .NET web form application, by choosing File and New at pull-down menu, and choose Target tab. Click OK
Create new .NET Web Forms Application

Will show the first screen of Wizard to build .NET web form application, just click Next button


There are 3 option that you can select. Since we already open the application from the beginning, choose Use the library list and application object from an existing target option. Click Next


Just click Next again when you asked to Chooce a target window


Change if you want to change the target, leave it with click next button if you want to use default target (recomended)


and do the same thing for the Specify Project Information, just click Next


Type your web application name.


Add your resource files or directories, including PBR files, image files, etc.


Add your javascript (.js) file if you want to.


Choose Directly deploy to IIS if you want to deploy with your current machine, meanwhile you can generate setup file if you want to deploy into other machine.


Now you are ready to deploy the web form. Click finish.


After you click Finish button, there is a new target created named pbtutor_webform. Click the Run Icon at the menu toolbar to start deploy. Wait until finish.


If deploy process was finish, see the error statements (if any) and please check the Unsupported feature tab.

There are many functions that unsupported if you deploy into web application. Fortunately, Powerbuilder will list all the unsupported features after the deploy was finish. Remember, it will be error if you push to run the application without fix the list. See the online help which come with the installation of Powerbuilder to see all the unsupported feature.

And here is the result, you can compare with the window base version. Remember, the web-based version only can view and run with Microsoft Internet Explorer only, starting version 6.0 to up
The Web form version

The original Window version
 (c) Copyright by sambalterasi.com
»»  READMORE...